Difference between revisions of "FAQ Frequently Asked Questions"
m (Protected "FAQ Frequently Asked Questions" ([edit=sysop] (indefinite) [move=sysop] (indefinite))) |
|||
| Line 109: | Line 109: | ||
==Access Control== | ==Access Control== | ||
If you want to set up an access control for certain groups, you have to insert | If you want to set up an access control for certain groups, you have to insert | ||
<pre> <accesscontrol>group1</accesscontrol> </pre> | <pre> < accesscontrol>group1</accesscontrol> </pre> | ||
or | or | ||
<pre> <accesscontrol>group1,,group2,,group3</accesscontrol> </pre> | <pre> < accesscontrol>group1,,group2,,group3</accesscontrol> </pre> | ||
at the top of the text. <br> | at the top of the text. <br> | ||
Caution: Only authorized user groups have access to your page! | Caution: Only authorized user groups have access to your page! | ||
Revision as of 09:27, 7 April 2014
German Version of the FAQs
A collection of frequently asked question about CoLab is provided here:
Create new page[edit]
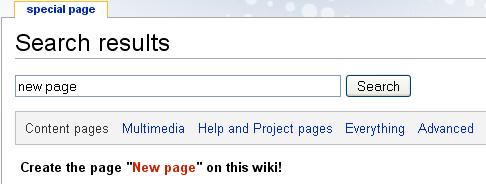
To create a new page, enter the title of your page into the search window on the main page (e.g new page):

If the title is not forgiven, you get the following result:

Follow the red link.

Now you can edit the page.
To get a preview of page, click on Show Preview.
To save the page, click on SavePage.
Text design[edit]
1.) Wiki-Syntax
The MediaWikiSyntax is used for formatting of text in wiki pages.
The Sandbox offers a good opportunity to pratice or testing.
For a detailed description click here.
2.) Textcolor
An additional useful formatting, write in color.
To color the text, you have to insert <font> tags.
This <font> color="green"> green text </ font> appears in text, as follow: green text.
Possible colors are: magenta (color="magenta'),yellow (color="yellow") or purple (color="purple").
Another Possibility: Define colors via hexademical codes like the color FF6600 (color = "# FF6600").
Contents[edit]
Tables of contents will created automatically, if three or more headings on a WikiPage are defined.
=Überschrift=
==Überschrift==
===Überschrift===
To suppress tables of contents, insert
__NOTOC__
into the text.
To force tables of contents, insert
__TOC__
into the text.
Create Category[edit]
To create a category in an article, insert
[[Category Example]]
into the text.
The item is automatically assigned to the category example.
If it not exist, follow the red category- link.
The Page will be opened in edit mode.
Special case: to the categories already assigned article, will displayed before the large text field (at smaller screen resolutions it looks like the category is already available).
Add Category[edit]
Categories are assigned to pages, by inserting
[[Category:Example|XY]]
into the text. The page is automatically assigned to the appropriate category.
Alphabetical Sorting of Categories[edit]
It should always be taken care, that categories be sorted alphabetically.
Example: Assigning a page with the title Meeting to the category Example:
[[Category:Beispiel|Meeting]]
The page Meeting appears among M at the category Example.
Search by Category[edit]
To search for a category, click on the search button without entering a search item.
It appears the advanced search.
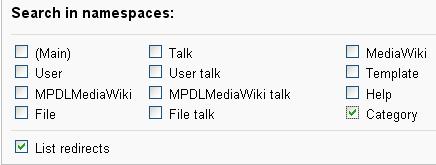
Disable the Namespace Main und activate the Namespace Category.

The search item can now be entered to the searchbox.
References[edit]
References:The Cite-Template was installed at Colab, to faciliate the citing of sources.
Quotes or cross references are issued as a nowiki><ref...></nowiki>-tag.
Formating and Output are possible at any place e.g. :
[...]
Digital Library Federation."<ref name="mets standard">http://www.loc.gov/standards/mets - METS homepage</ref>
[...]
==References==
<references />
Access Control[edit]
If you want to set up an access control for certain groups, you have to insert
< accesscontrol>group1</accesscontrol>
or
< accesscontrol>group1,,group2,,group3</accesscontrol>
at the top of the text.
Caution: Only authorized user groups have access to your page!
It is not necessary to use the ',,' separator at the end of the element content.
Upload Files[edit]
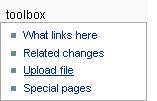
To Upload files at Colab, click on the third point of toolbox: Upload file.

Now you can choose files and add a description.
Finally click on Upload file (bottom of page).
Following formats can be used :
png, gif, jpg, jpeg, wmz, mm, pdf, doc, xls, ppt, zip, java, txt.
If the file is already uploaded to Colab, appears a warning message.
Its also possible to upload the latest version of a file.
Now you can insert the file into your Page:
[[File:Example.jpg]]
An other opportunity: click on this symbol![]() at the tool-bar.
at the tool-bar.
Link to a Wiki Page[edit]
It's possible to create links to internal Wiki Pages.
Therefor you have to insert the title of page, as follow e.g. Sandbox:
[[Sandbox|link to sandbox]]
It´s also possible to assign individual names for links, after a vertical bar.
After saving accrues a link to page e.g. link to sandbox.
Link to External Page[edit]
Similar to create links to internal Wiki Pages, it´s possible to create links to external pages.
Therefor you copy the URL of page.
The next step is to paste the URL into the text as follow e.g. MPDL:
[[http://www.mpdl.mpg.de/link to MPDL]]
It´s also possible to assign individual names for links.
After saving accrues a link to page e.g.link to MPDL.
Calendar[edit]
this extention is not installed anymore Grossmann (talk) 12:09, 13 March 2014 (CET)
The Calendar used the Categories-tool in background.
Once a page is assigned to a special Date-Category(e.g."2007/07/03"), the page is listed at [[Special:Events].
To create a Calendar, you have to insert:
<calendar/>
into the text. <calendar/>
Create Short Links[edit]
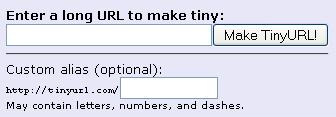
Short Links of a page are created by TinyUrl.
Therefor you copy the URL and paste it to following window:

Afterwards click at Make TinyURL!.
Now you can use the short version of your URL.
Create Tables with TableEdit[edit]
TableEdit is a PlugIn to create tables on a easy way.
A detailed description, you find here.
1.) Integrate a blank table:
< NewTableEdit/>
2.) Integrate a table with predefined headings:
  <NewTableEdit>

heading 1
heading 2
heading 3
etc..

</NewTableEdit>
Afterwards save the text to create the table.
The Table accrues as follow:
| heading 1 | heading 2 | heading 3 |
|---|---|---|
| edit table |
To edit the table, click onto the blue edit table link.
Create Simple Tables[edit]
A detailed description, you found here.
1.) Create a simple table:
| heading | heading | heading |
|---|---|---|
| example1 | example2 | example3 |
| example4 | example5 | example6 |
| example7 | example8 | example9 |
{|
|-
! heading !! heading !! heading
|-
| example1 || example2 || example3
|-
| example4 || example5 || example6
|-
| example7 || example8 || example9
|}
2.) Create a table with frames and highlighted box heads:
| heading | heading | heading |
|---|---|---|
| example1 | example2 | example3 |
| example4 | example5 | example6 |
| example7 | example8 | example9 |
{| class="wikitable"
|-
! heading !! heading!! heading
|-
| example1 || example2 ||  example3
|-
| example4 || example5 || example6
|-
| example7 || example8 || example9
|}
3.) Create a table with a line break at box head:
| head- ing |
head- ing |
head- ing |
|---|---|---|
| example1 | example2 | example3 |
| example4 | example5 | example6 |
| example7 | example8 | example9 |
{| class="wikitable"
|-
! head- <br/> ing !! head- <br/> ing !! head- <br/> ing
|-
| example1 || example2 || example3
|-
| example4 || example5 || example6
|-
| example7 || example8 || example9
|}
Cooperative Work – Discussion & Comment[edit]
First please see the Editing policies.
1.) Discussion:
For every Wiki Page is automatically created a discussion page.
Thereby it´s about a " Meta-page".
Informations about an article can placed there e.g. " We need more Examples..." or " We need more passages ...".
The discussion page is reachable from every page, s.a. discussion page
2.) Comment:
If you want like to forgive an intelligible comment for an articel, you may want to insert a colon and a signature.
Therefor the comment will closed with four tildes:
~~~~
It will automatical create a signature with Username and timestamp.
The signature appears as follow:
--Tanja 08:53, 6 August 2008 (UTC).
Any other Question?[edit]
If you have any other question, please feel free to contact the CoLab-Support. A German version of the FAQs is provided here.